SUBSCRIBE TO DR. WALTER SALUBRO’S YOUTUBE CHANNEL
Read below for full video transcript.
I am going to share three low back rehab exercises that may be useful for rehabbing the back when there’s an injury to the spine, such as a disc bulge injury or any low back injury. These are some great exercises, and I’ll show you how I recommend them to my patients and what you can do at home. Remember with any exercise I ever talk about on my channel, you should get it cleared by your own doctor, physician, chiropractor, therapist, whoever it is that you are seeing because not one particular exercise is specific for any one person. We always assess our patients, examine them, and consult them. I know what they can and cannot do based on their functionalities and then I prescribe their exercises. This is more for a general information.
I want to welcome you again, it’s Dr. Walter Salubro for those of who that haven’t met me. I’m a chiropractor in Vaughan, Ontario, Canada and I’ve been a chiropractor now for 20 years. What we do is corrective chiropractic methods and care to help people recover from chronic spinal conditions, especially degenerative spinal conditions. We apply corrective techniques to restore the spine to proper and better alignment, restore their posture to better alignment and get people to function and move better, essentially to live better through corrective chiropractic care. We have helped many people through many chronic ailment and conditions on their spine. This channel is about helping people discover corrective chiropractic care, learn about corrective chiropractic care and also get tips and strategies for rehabbing and exercising the back through different videos that I put out.
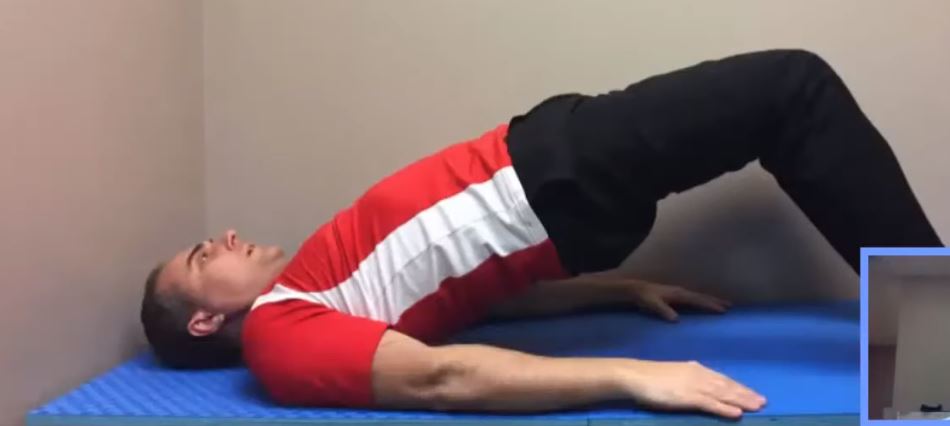
With these exercises I will show you what they are, tell you when I think it’s appropriate for people to do them, and how to do them. Let me show you the first one. It is going to be a back bridge. So when would I recommend the back bridge? I would recommend them to my patients after they’ve been under some care for some time. They may be a patient that has a disc bulge at L4 L5 or a disc bulge at L5 S1 in the lumbar spine. They may have a low back or lumbar spine sprain or strain, they may have a sacroiliac joint dysfunction, or even sciatica leg pain, numbness in the leg. So when we want to rehabilitate the back, these are great strengthening and conditioning exercises. I would want to start someone off with these exercises immediately when they’re in acute pain, when they have trouble walking, bending, and moving. So you would start people off with stretching and mobility work, and then some entry-level core back exercises, and strengthening exercises. Then, move to more intermediate and eventually to an advanced level if they can get there.This exercise would be more on intermediate side. If I was starting this right away with patients, it would be two to four weeks into care.
The starting position for the back bridge is, you lie on the bed or on and ground and you are going to hook your knees up. Put your feet on the ground and bend your knees. You are going to bridge your self up.

You can bring your knees to more of a 90° angle. I’ll give you a couple of nuances. You see how my body is straight in line with my thighs? This is like a reverse plank. What you are engaging here are the gluteal muscles, hamstring, and some back extensors as well. The gluteal muscles are very important stabilizers, they are more extensors for the thighs but they need to be strong because every time you walk, you are propelling forward. And when you walk, you have to extend your thighs back, so if they are sleepy and all the muscle fibers are not fully activated, which is the case in 95% of my patients that I see with chronic back conditions, then the low back muscles have to fire first with that extension motion of the thigh. When you rehabilitate the gluteal muscles as well as the hamstring, you’re going to take an extra load off the lumbar spine muscles so it helps the back recover.
What you can do for the back bridge is hold it for one second. Count to one, and then you are going to come back down to the starting position. Repeat that 10 times, starting off with one set and then work your way up to 3 sets taking a 10 second break in between. That is one way to do this, or you can do a maximum hold, holding the bridge for 30 seconds maximum or until your fatigue to your maximum. Eventually, work it up to 60 seconds, then 120. How many times a week should you do it? Because of the strength and the exercise, I tell my patients to do it three times a week. The days you do it on does not matter as long as there is no discomfort. When it comes to stretching the lumbar spine or any other stretches, three times a week is enough.
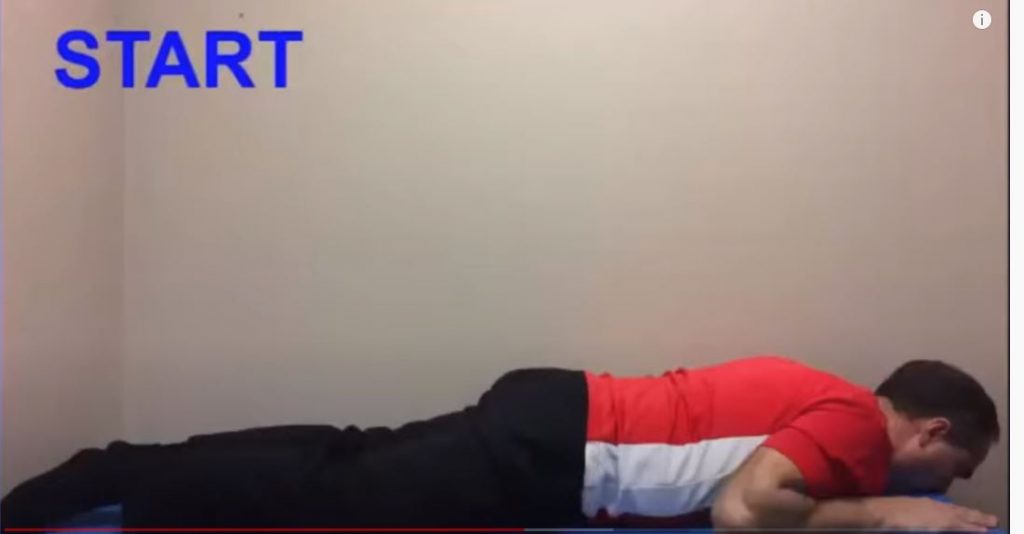
For the second exercise you are going to get into a prone position, lie down on your stomach, on your chest, hands by the side.

Then you are going to prop yourself up onto your elbows.

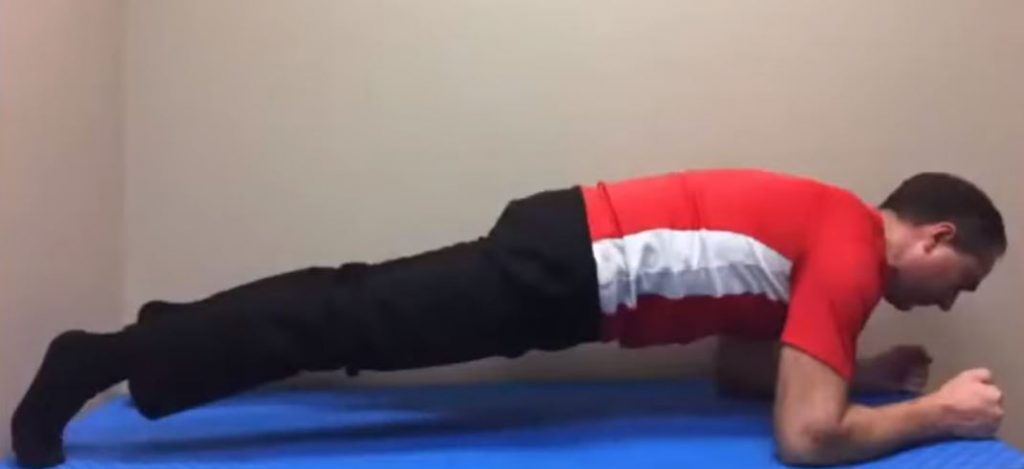
The purpose of the plank is to engage the glutes. The extensors of your back are also engaged, and now you are also engaging the abdominal muscles. What this does is when the abdominal muscles are well-maintained, strong and tight, it helps to keep the core, the intra-abdominal pressure well contained. It helps to stabilize the core and the back and helps prevents injuries. There are a couple of ways that people do this wrong. If you begin to dip down, so you are losing the plank then that’s cheating and you’re fatiguing, so you need to bring yourself up again. If you are bending upward, like a teepee or a tent then you are also cheating and fatiguing out. That’s not going to be a good way to do a plank. You need to plank yourself and activate the abdominal, glutes and the back extensors at the same time.
So again, you start by laying flat on your stomach and then propping yourself up on your elbows. Everything from your head, shoulder, hip, knees, and ankles should be lined up and you should be up on your toes. This involves a full body engagement. You can get some extension in your neck by looking up if you want, but keeping your head neutral is good too. The recommendation I give to my patients with this exercise is I start them off with 30 seconds and then make them work their way up to their tolerance until they can hold it for 2 minutes. If you can hold for longer than 2 minutes that’s really, good, 2 minutes is the minimum. If you start to shake, or are dipping down then you have to stop and reset or master the hold for a shorter period of time, like 10 or 20 seconds and then slowly work your way up to 2 minutes. Doing this three times a week is fine. One of the most common questions I get asked on my videos is when do I do these exercise? What time of the day do I do them? There is no certain time, whatever time works best for you. It can be done in the morning, afternoon, or evening. Sometimes people wake up in the morning with back aches and pain in the morning, and feel better in the afternoon, so do it during the time you feel better.
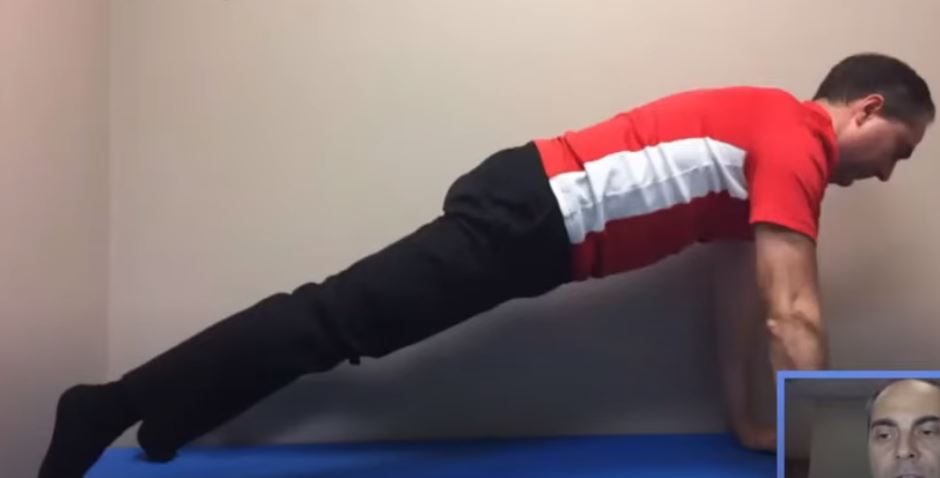
This is the third and final exercise. The one before is a prone plank, now we go into a full plank. The starting position is the same as the prone plank, lying on your stomach, hands on the side by your head. Then you are going to prop your self up on to your hands.

You are on your toes, and your arm is fully out, so you are holding yourself up on your wrist. Your head is lined up with your shoulder, your back is completely erect and lined up with your hips, knees, legs and ankles. This exercise is a bit more difficult as you are on your hands. You are higher away from the ground so there is more gravity. The effects of gravity is acting more on you because of the distance so it is a bit more challenging. Your arms may get fatigued, you have to balance yourself on your wrists. If you have wrist, shoulder, elbow issues then you have to be careful. This exercise engages the extensors of your back as well as your neck. You are contracting your abdominal muscles so you are engaging them. You may feel an abdominal ache, like a workout pain because you are working those muscles. You are engaging the glutes, you want to contract and squeeze the glutes which is very important as well as balance on your toes. This is a maximum hold exercise. Start out with maybe 10-20 seconds and work your way to two minutes. Three times per week for strengthening, and at any time of the day that works with your schedule.
Those are the three exercises for L4 L5 disc bulge. If you enjoyed that and found that useful let me know. Make sure to check out my channel and subscribe to see more exercises for L4 L5 disc bulges.

